 HOME
ABOUT
CONTACT

在上一篇教學結構指標中,我們有提到鏈結串列(Linked List)是一串可靈活變動且共享的記憶體,而這到底是什麼意思呢?
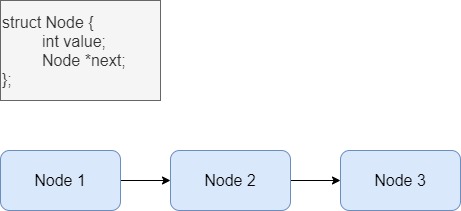
本篇會介紹鏈結串列的特性和使用範例,讓讀者更清楚理解動態和靜態配置的差異。首先,我們先來看看鏈結串列(Linked List)的簡圖:

我們在結構定義裡宣告的成員中,其中之一就是結構指標,而它是用以指向下一個結構的記憶體位址,因此當只要拿到指向 node 1 位址的指標時,就可以方便地去修改 node 2 和 node 3 結構內的資料。
建立鏈結串列時,若使用的連接方式是將指標指向靜態配置的結構,這樣的方式並不能構成鏈結串列,為什麼這麼說呢? 我們先來看看下例:
struct node {
    int val;
    node* next;
};

void create_linked_list(struct node* head) {
    struct node node1;
    node1.val = 200;
    node1.next = nullptr;
    head->next = &node1; //讓 head 的 next 指標指向 node1
}

int main()
{
    struct node head;
    head.val = 100;
    head.next = nullptr;
    create_linked_list(&head);

    return 0;
}
假設我們先在主函式(main)先靜態配置一個節點,並且命名為 head 作為鏈結串列的頭,然後我們也定義了一個 create_linked_list 的函式,在這個函式中,我們用靜態配置的方式宣告了一個結構叫 node1,並且用 head 成員中的 next 指標指向 node1 結構內的資料。
到目前為止,都還沒有任何問題,那麼問題會出現在哪裡呢? 當我們回到主函式(main)繼續用 head 結構指標去輸出我們的鏈結串列時,你會發現執行時出錯了,系統會向你回報程式存取到不合法的記憶體位址,如下例:
int main()
{
    struct node head;
    head.val = 100;
    head.next = nullptr;
    create_linked_list(&head);

    struct node* ptr = &head; //用另一個指標 ptr 指向 head
    while (ptr != nullptr) { //若 ptr 不是空指標,則進入迴圈
        std::cout << "value = " << ptr->val << endl;
        ptr = ptr->next; // 用 ptr 指向下一個節點
    }

    return 0;
}
為什麼會這樣呢? 還記得我們在動態記憶體配置內文中有提到,動態記憶體配置的有效範圍和全域變數相同,因此當在 create_linked_list 函式裡用靜態配置的方式宣告結構 node1,它的有效壽命就只有在這個函式執行完成之前。
也就是說,當程式返回到主函式(main)的時候,node1 節點事實上早就已經不見了,它的記憶體空間已經被系統拿回去了,因此才會回報程式存取到不合法的記憶體位址。
若要解決上面環節的問題,就必須得用動態配置的方式才能建立鏈結串列,正確地說,這才是鏈結串列的核心。因此你可以理解成,若想將所有的動態配置的結構綁在一塊方便存取,就可以用鏈結串列的方式組成,我們看看下面的範例:
struct node {
    int val;
    node* next;
};

void create_linked_list(node* head, int size)
{
    struct node* cur = head;

    while (cur->next != nullptr) {
        cur = cur->next;
    }

    for (int i = 0; i < size; i++) {
        node *new_node = (node*)malloc(sizeof(node));
        if (new_node == nullptr) {
            printf("Allocate node failed\n");
            return;
        }
        new_node->val = i;
        new_node->next = nullptr;
        cur->next = new_node;
        cur = new_node;
    }
}

int main()
{
    struct node* head = (node*)malloc(sizeof(node));
    if (head == nullptr) {
        printf("Allocate Head node failed!");
        return;
    }
    printf("Allocate head node success!\n");
    head->val = 100;
    head->next = nullptr;
    create_linked_list(head, 5);
    struct node* ptr = head;
    while (ptr != nullptr) {
        std::cout << ptr->val << " ";
        ptr = ptr->next;
    }
}
只要我們所有的結構都是用動態配置的方式宣告,並且將 next 指標正確地址向下一個節點,你就會看到 while 迴圈可以順利地輸出所有節點的數值。這就是鏈結串列的簡單應用,後續在程式中的任何位置,只要能拿到 head 指標,都可以繼續使用這串記憶體空間,這就能讓程式能夠很有效地反覆使用記憶體空間了。
另外提醒一下,鏈結串列的應用時機通常是資料之間有著強烈的關聯性,例如大小集合關係、階層性關係(Hierarchy)等等,因此在下一篇文章介紹結構陣列時,這也是它們彼此差異的其中一點。
下一篇: 第二十二課 - 結構陣列(Struct Array)
Last updated: